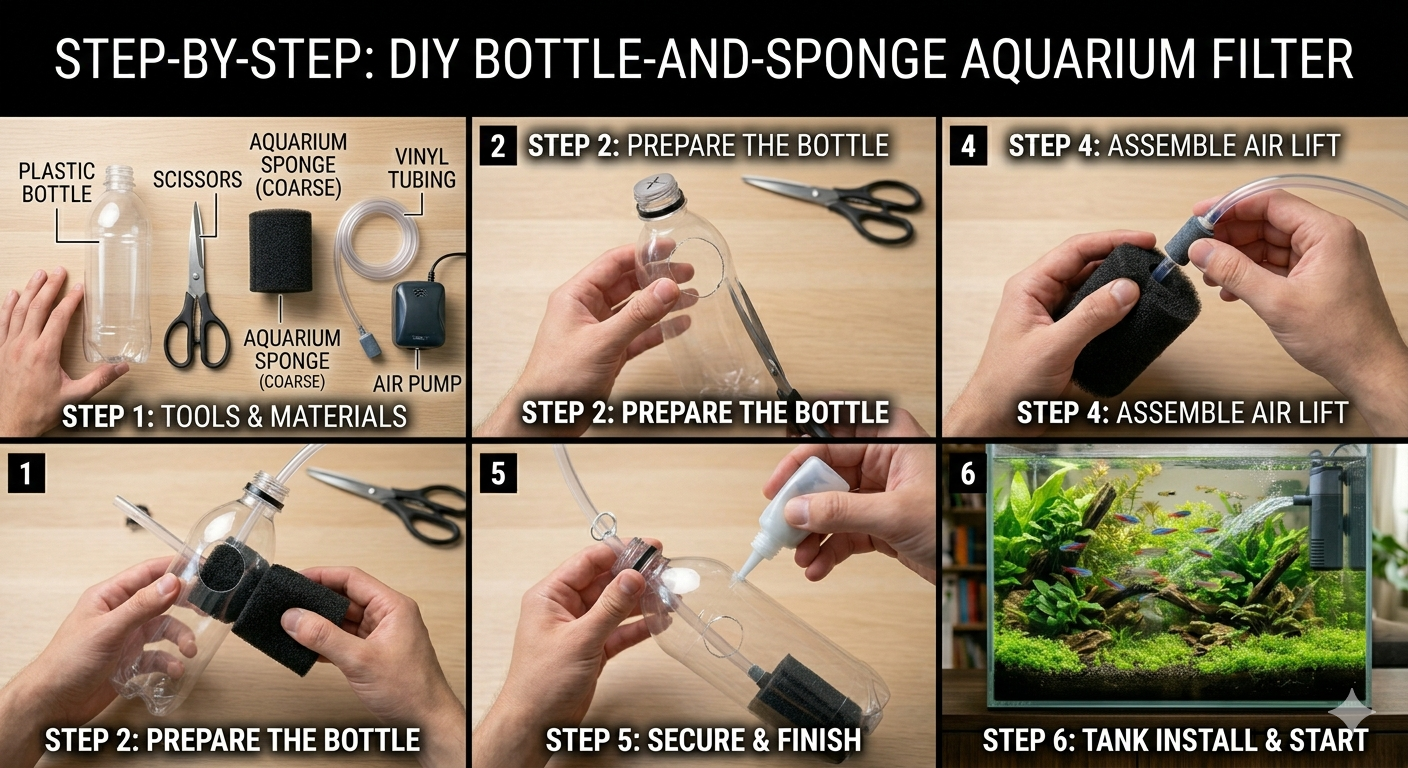
If you’re starting an aquarium on a tight budget, building your own filter is one of the smartest ways to save money. A DIY aquarium filter using a plastic bottle and sponge is cheap, effective, and surprisingly easy to make.
This simple filter works especially well for small tanks, shrimp tanks, and beginner setups where you need gentle, biological filtration without spending much.
In this guide, you’ll learn:
How a DIY bottle filter works
Materials you need
Step-by-step instructions
Pros and limitations
Tips to make it more effective
🐠 Why Use a DIY Aquarium Filter?
A filter is essential for any aquarium because it:
Removes waste particles
Supports beneficial bacteria
Keeps water safe for fish
A DIY sponge bottle filter focuses mainly on biological filtration, which is the most important part of keeping your tank stable.
👉 It’s ideal for:
Small aquariums (2–20 gallons)
Shrimp tanks
Fry (baby fish) tanks
Budget setups
🧰 Materials You Will Need
Before you start, gather the following items:
A clean plastic bottle (500ml to 2 liters)
Sponge or foam (aquarium-safe)
Air pump
Airline tubing
Air stone (optional but recommended)
Scissors or cutter
Rubber band or zip ties
Small gravel or ceramic media (optional)
👉 Most of these items are inexpensive and easy to find locally
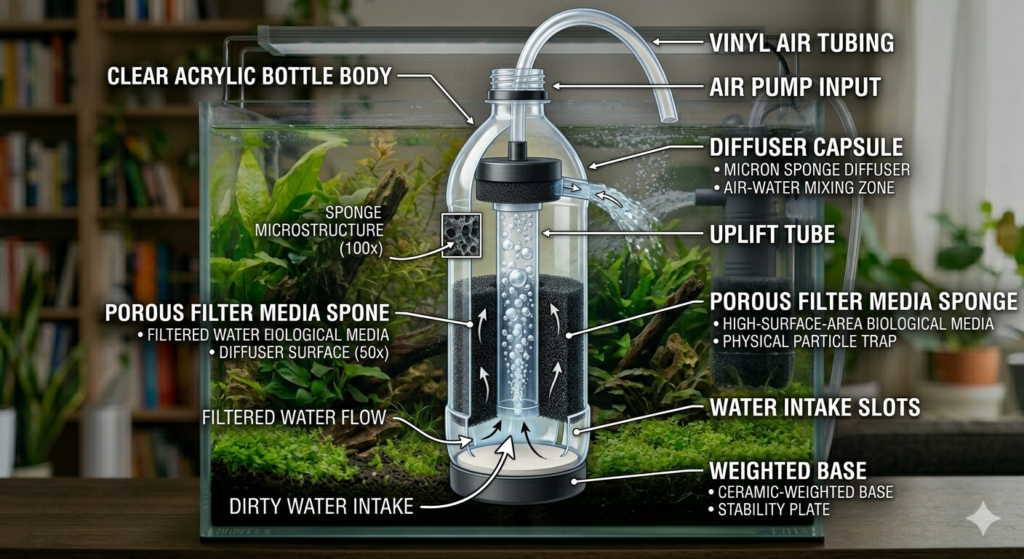
⚙️ How the DIY Bottle Filter Works
This filter uses air bubbles to create water movement:
Air pump pushes air through tubing
Air bubbles rise inside the bottle
Water is drawn through the sponge
Sponge traps debris and hosts beneficial bacteria
👉 It combines mechanical + biological filtration in a simple design
🪜 Step-by-Step Instructions
Step 1: Prepare the Bottle
Take a plastic bottle and remove the label
Rinse it thoroughly
Cut the bottom of the bottle (this will be the water intake area)
Step 2: Create Sponge Placement
Cut a sponge to fit inside the bottle opening
The sponge should be snug but not too tight
Insert the sponge into the bottle neck area
👉 This sponge will act as the main filter media
Step 3: Make Air Tube Entry Hole
Use scissors or a heated needle to make a small hole in the bottle cap
Insert the airline tubing through the hole
Ensure it fits tightly to avoid air leaks
Step 4: Add Air Stone (Optional)
Attach an air stone at the end of the tubing
Place it inside the bottle
👉 This helps create finer bubbles and better water movement
Step 5: Connect to Air Pump
Connect the tubing to an external air pump
Place the air pump outside the aquarium
Step 6: Add Optional Filter Media
You can place small gravel or ceramic rings inside the bottle
This increases surface area for beneficial bacteria
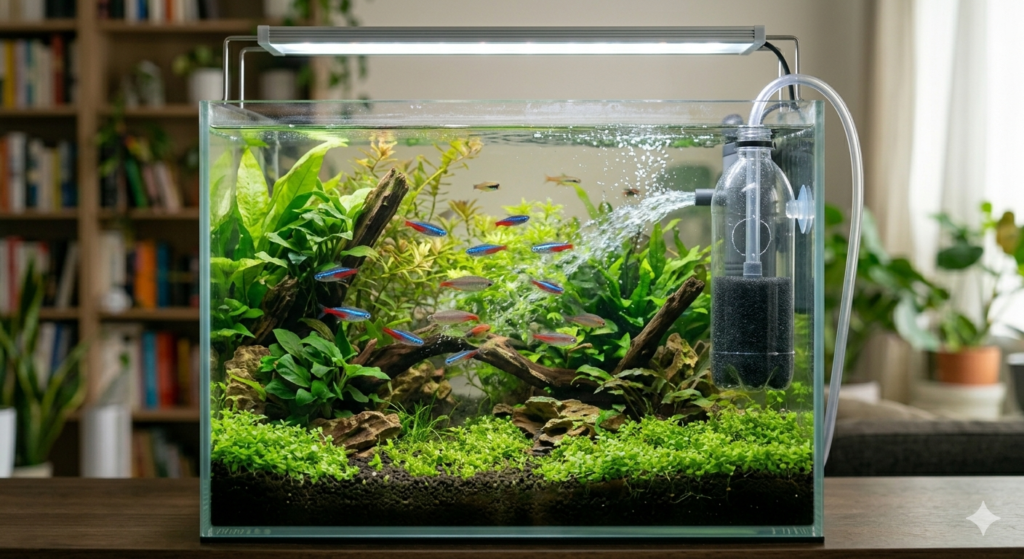
Step 7: Install the Filter in the Tank
Place the bottle filter vertically inside the aquarium
Ensure the cut bottom is submerged in water
Turn on the air pump
👉 You should see bubbles rising and water flowing through the sponge
💡 How to Set It Up Properly
Position the filter in a corner of the tank
Make sure water can freely enter through the sponge
Avoid blocking airflow
Ensure the sponge is always submerged
🧪 Maintenance Tips
Clean the sponge every 2–4 weeks using tank water (not tap water)
Avoid over-cleaning (you don’t want to kill beneficial bacteria)
Check air tubing for clogs or leaks
Replace sponge if it degrades over time
👉 Regular maintenance keeps the filter efficient
✅ Advantages of DIY Bottle Filter
Very cheap to build
Easy to assemble
Great for beginners
Safe for shrimp and fry
Provides biological filtration
👉 Ideal for budget aquarium setups
❌ Limitations of DIY Bottle Filter
Not suitable for large tanks
Limited mechanical filtration
Requires an air pump
Not visually appealing
Lower flow compared to commercial filters
👉 Best used for small or secondary tanks
📊 DIY Filter vs Commercial Filter
Feature
DIY Bottle Filter
Commercial Filter
Cost
Very low
Medium to high
Performance
Basic
Advanced
Maintenance
Simple
Moderate
Aesthetic
Low
High
Best For
Small tanks
All tank sizes
🐟 Best Use Cases
This DIY filter works best in:
Shrimp tanks
Betta tanks (with gentle flow)
Fry breeding tanks
Quarantine tanks
Backup filtration
👉 It’s not ideal for heavily stocked large aquariums
🚫 Common Mistakes to Avoid
Using a bottle with toxic residue
Cutting the sponge too loose or too tight
Using strong air flow (can disturb fish)
Not sealing tubing properly
Placing the filter incorrectly in the tank
👉 Small setup errors can reduce efficiency
🧠 Pro Tips for Better Performance
Use high-quality aquarium sponge
Add ceramic media inside the bottle
Use a medium-strength air pump
Combine with a regular filter in larger tanks
Position near water flow areas
👉 These improvements increase filtration quality
🐠 Final Thoughts
A DIY aquarium filter using a bottle and sponge is one of the simplest and most cost-effective filtration solutions for beginners.
While it doesn’t replace high-end filters, it performs well for:
Small tanks
Low-budget setups
Backup filtration
👉 With proper setup and maintenance, it can keep your aquarium water clean and your fish healthy.
✅ Golden Rule
“Good filtration isn’t about expensive equipment—it’s about consistency and beneficial bacteria.”
 1
1